AWS cloud setup (Complexity Science Hub)
How To Set Up Django with Postgres, Nginx, and Gunicorn on an Ubuntu 22.04 (AWS EC2 Instance)
Introduction:
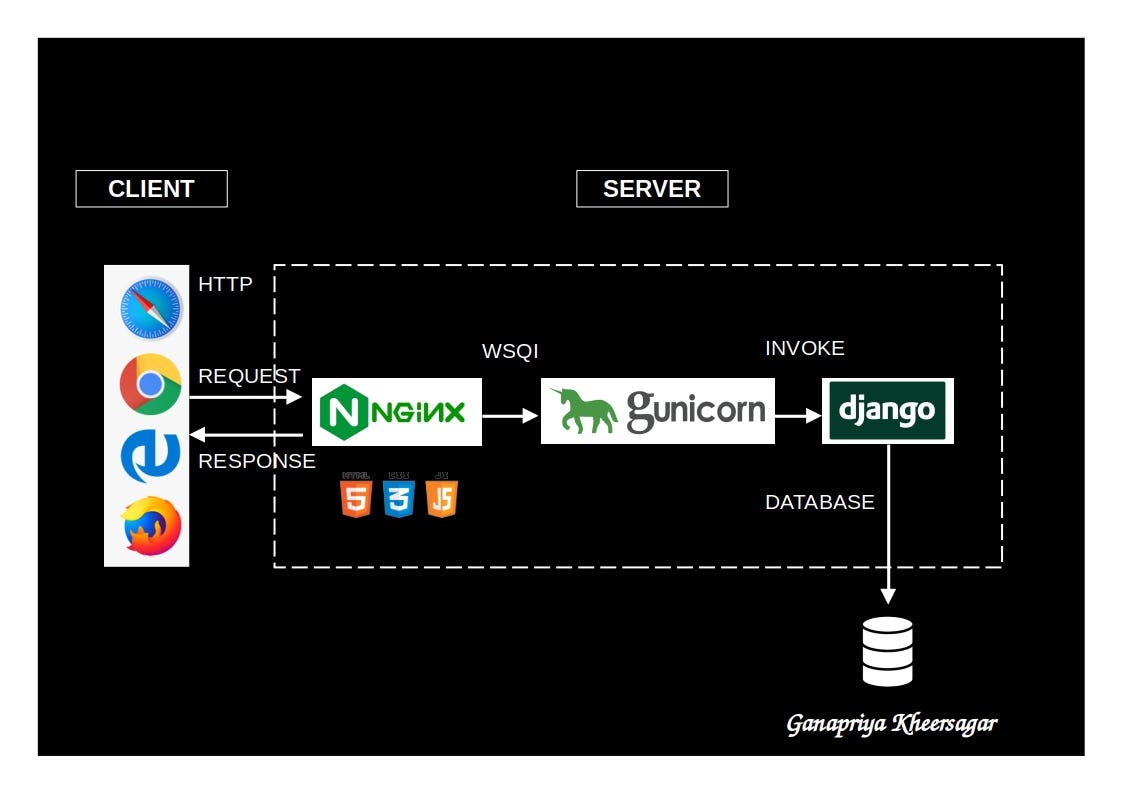
Django, a robust web framework, accelerates the development of Python applications and websites. While the built-in development server is suitable for local testing, any production-related endeavors demand a more secure and potent web server. This tutorial guides you through the installation and configuration of essential components on Ubuntu 22.04 to bolster the support and seamless serving of Django applications. We will also be setting up a PostgreSQL database on the same server instead of using the default SQLite database. We will configure the Gunicorn application server to interface with our Django application. We will then set up Nginx to reverse proxy to Gunicorn, giving us access to its security and performance features to serve our apps.
Prerequisites and Goals
In order to complete this guide, we should have a fresh Ubuntu 22.04 server instance with a basic firewall. This can be any EC2 instance with Ubuntu 22.04 as the Operating System. We will be installing Django within a virtual environment on the above-mentioned server (or Virtual Machine). Installing Django into an environment specific to our project will allow our project and its requirements to be handled separately.
Once we have both our Postgres database and Django application up and running on the same server, we will install and configure the Gunicorn application server. This will serve as an interface to our application, translating client requests from HTTP to Python calls that our Django application can process. We will then set up Nginx in front of Gunicorn to take advantage of its high performance connection handling mechanisms and its easy-to-implement security features.
Setting Up AWS EC2 Instance for Seshat Backup Server
In this tutorial, we work with an AWS EC2 instance as the server. Using the AWS Management Console or any preferred method, it is straightforward to create an EC2 instance. Please note that for optimal compatibility, we recommend using Ubuntu 22 as the operating system. How much processing power and memory to choose is totally optional for the purpose of this tutorial. As a hint, the website has been functional in the past two+ years on a t2.micro server.
Instance |
vCPU |
Memory (GiB) |
t2.nano |
1 |
0.5 |
t2.micro |
1 |
1 |
t2.small |
1 |
2 |
t2.medium |
2 |
4 |
t2.large |
2 |
8 |
t2.xlarge |
4 |
16 |
t2.2xlarge |
8 |
32 |
- Creation of AWS EC2 Instance:
Navigate to the AWS Management Console and follow the straightforward instructions to create an EC2 instance.
Ensure you choose a proper RSA key-pair during the setup process. Safely store the key-pair file on your local machine. In this tutorial, we refer to the key-pair file as seshat-backup-server-kp.pem.
- Operating System Compatibility:
To avoid potential compatibility issues, it is recommended to use Ubuntu 22 as the operating system for your EC2 instance.
- Status Check Verification:
Monitor the EC2 dashboard until the “Status Checks” indicate a status of “2/2 checks passed.” This ensures that the EC2 instance has successfully passed both system and instance status checks.
Upon AWS EC2 instance creation, make sure you open the firewalls to inbound IPV4 and IPV6 traffic, as well as SSH, HTTP and HTTPS ports. This can easily be done through adding security group rules:
IPv4 |
All TCP |
TCP |
0 - 65535 |
0.0.0.0/0 |
IPv6 |
All TCP |
TCP |
0 - 65535 |
::/0 |
IPv4 |
HTTP |
TCP |
80 |
0.0.0.0/0 |
IPv4 |
HTTPS |
TCP |
443 |
0.0.0.0/0 |
IPv4 |
SSH |
TCP |
22 |
0.0.0.0/0 |
And the outbound rules:
IPv4 |
All traffic |
All |
All |
0.0.0.0/0 |
By following these detailed instructions, you not only ensure a secure setup of your AWS EC2 instance but also pave the way for a hassle-free experience with the Seshat Backup Server.
We need to keep track of two things from the AWS EC2 server:
the public ip address: 16.171.40.111
Public IPV4 DNS: ec2-16-171-40-111.eu-north-1.compute.amazonaws.com
In the AWS EC2 dashboard, go to connect tab and select SSH client, you will see something like this that you can run locally to connect to the AWS EC2 instance:
ssh -i "seshat-backup-server-kp.pem" ubuntu@ec2-16-171-40-111.eu-north-1.compute.amazonaws.com
This is how you can connect to the server from your local machine from the folder where you have saved the file “seshat-backup-server-kp.pem”. You might need to add sudo before the command to make it work. Pretty straightforward. Also, say yes if asked whether you want to add the server address to the list of known hosts.
After connecting to our AWS EC2 server via SSH, you will get a terminal command line that is the terminal of the AWS EC2 Instance you just created, it might look something like this:
ubuntu@ip-172-31-41-211:
Go on and create a folder that will be dedicated to host everything related to the project:
mkdir seshatprojecthome
cd seshatprojecthome
First things first, we need to get the latest packages from Ubuntu:
sudo apt update
sudo apt install python3-venv python3-dev libpq-dev postgresql postgresql-contrib nginx curl
sudo apt-get install -y gdal-bin
sudo apt-get install -y libgdal-dev
sudo apt install -y libgeos++-dev libgeos3.10.2
sudo apt install -y libgeos-c1v5 libgeos-dev libgeos-doc
Bringing in the Codebase
Make sure you know where the codebase lies on GitHub and from inside seshatprojecthome directory, do a git clone (if git is not installed on the server you might have to install it):
git clone https://Seshat-Global-History-Databank/seshat.git
Among the files brought in via the git clone command, there is an important file called: requirements.txt, which includes all the more specific packages and libraries we need for our Django project to run properly. But before that, we need to start a virtual environment specific to the Django project and make sure that we install everything in there. We do so inside the seshatprojecthome directory, where the seshat folder also resides:
python3 -m venv seshatprojectenv
Before installing our project’s Python requirements (requirements.txt), we will need to activate the virtual environment. We can do so by typing:
source ~/seshatprojecthome/seshatprojectenv/bin/activate
The new prompt will look something like this:
(seshatprojectenv)user@host:~/seshatprojecthome$
With our virtual environment active, we install the packages:
(seshatprojectenv) $ sudo apt install build-essential
(seshatprojectenv) $ pip install -r /home/ubuntu/seshatprojecthome/seshat/requirements.txt
(seshatprojectenv) $ pip install django gunicorn psycopg2-binary
(seshatprojectenv) $ pip install "django-geojson [field]"
Note
We have such a thing in the running new backup requirements.txt, but it is probably not important:
backports.zoneinfo==0.2.1;python_version<”3.9”
In any case, if you get an error like:
× Building wheel for backports.zoneinfo (pyproject.toml) did not run successfully.
Ignore it. It ‘s not gonna cause any problems.
Make sure that psycopg and django-heroku are installed properly.
Configure GDAL and GEOS
Open seshat/settings/base.py and check (or update) the paths in the following variables, which should be to the paths to your local gdal and geos installations:
GDAL_LIBRARY_PATHGEOS_LIBRARY_PATH
Preparing the Database Arrival
With codebase and its necessary packages taken care of, we start the database side of the job. We type the following command in the AWS EC2’s terminal to log into an interactive Postgres session (as the default user: postgres):
sudo -u postgres psql
If we did not have a database .dump file, we had to create one from scratch, but now we just need to use scp on our local machine to transfer the .dump file that we have saved locally to the AWS server:
sudo scp -i /home/majid/dev/AWS/seshat-backup-server-kp.pem -r aws_pg_backups/backup_Jan_8.dump ubuntu@ec2-16-171-40-111.eu-north-1.compute.amazonaws.com:seshatprojecthome/
We need to change the password for user postgres (the root user of our postges service):
ubuntu@ip-172-31-19-221:~$ sudo su postgres
postgres@ip-172-31-19-211:/home/ubuntu$ psql
postgres=# ALTER USER postgres password 'mypassword';
To quit psql and exit postgres user:
postgres=#\q
postgres@ip-172-31-19-211:/home/ubuntu$ exit # or (CTRL + D)
Before we can fully get started with Postgres, we need to change the Postgres authentication settings in the AWS server. Go to the folder containing the postgres installation files and settings:
cd /etc/postgresql/14/main/
There are two files in the above directory we need to change slightly. One is the pg_hba.conf file. Open the file using sudo vim:
sudo vim pg_hba.conf
Inside pg_hba.conf, modify the following line and save the file.
# Database administrative login by Unix domain socket
host    all             all             0.0.0.0/0             md5
local   all             postgres                                md5
The second file here is postgresql.conf. Open the file:
sudo vim postgresql.conf
and find the following line:
listen_addresses='localhost'
Enable (uncomment) the above line and replace the ‘localhost’ with ‘*’. Save the file.
As we have changed some major settings, we need to restart the postgresql service in the AWS server terminal:
sudo service postgresql restart
We should then create an empty database (as user: postgres) before we connect it to the .dump file (which has already been transferred to the AWS server) and have a functional database serving our Django application. We do the following inside the AWS server terminal:
createdb -U postgres seshat_pg_db
And then:
pg_restore -U postgres -d seshat_pg_db /home/ubuntu/seshatprojecthome/backup_Jan_8.dump
The SQL database is now ready and can be accessed from the AWS server terminal. Make sure it is the case by:
ubuntu@ip-172-31-19-221:~$ sudo -i -u postgres
postgres@ip-172-31-19-211:/home/ubuntu$ psql
\c seshat_pg_db
postgres=# select id, name, new_name from core_polity;
Exit the database:
\q
exit # or (Ctrl+D)
Merging the Codebase and the database
With both the codebase and the database housed on the same AWS server, we are ready to introduce them to each other and deploy the web server for everybody to see on the web. First we need to make sure that the main Django settings file (settings/base.py) gets the correct credentials to use the postgres database (seshat_pg_db) as its main database. Introduce the database to the Django settings/base.py:
ALLOWED_HOSTS = ['127.0.0.1', 'localhost',  'xx.xxx.xx.xxx',]

DATABASES = {
    'default': {
        'ENGINE': 'django.db.backends.postgresql',
        'NAME': '****',
        'USER': '******',
        'PASSWORD': '*******',
        'HOST': 'localhost',
        'PORT': '5432',
    }
}
To create the .env file in the same directory as the manage.py file: (/home/ubuntu/seshatprojecthome/seshat), do:
vim .env
Get a Cesium access token
You will also need to generate an access token for Cesium in order for the globe to render on Seshat pages that include maps.
Visit the Cesium website and create an account.
Once you have an account, navigate to the “Access Tokens” tab and create a new token.
Add this token to the .env file as shown below.
The content of the .env file should look something like this:
DB_NAME = "seshat_pg_db"
DB_USER = "postgres"
DB_PASSWORD = "mypassword"  # the not mypassword one.
DB_HOST = "localhost"
DB_PORT = 5432

SECRET_KEY = '<secret_key>'

EMAIL_FROM_USER = 'seshatdb@gmail.com'
EMAIL_HOST = 'smtp.gmail.com'
EMAIL_HOST_USER = 'seshatdb@gmail.com'
EMAIL_HOST_PASSWORD = '<email_password>'

GOOGLE_APP_CLIENT_ID = '<client_id>'
GOOGLE_APP_SECRET_KEY = '<secret_key>'

ZOTERO_API_KEY = '<api_key>'
# For future use
EMAIL_APP_PASS = '<email_password>'
CESIUM_ION_ACCESS='<cesium_access_token>''
We now need to ask Django to bring all the static files of the project (CSS files, images, etc.) together. Inside the virtual environment and in the same path as manage.py:
python manage.py collectstatic
Everything seems to be in place to test the server using Django local server:
python manage.py runserver 0.0.0.0:8000
Now you should be able to see the website through your browser on: http://PUBLIC_IP_OF_AWS_SERVER:8000
Note
make sure you use http and (not https), even if the browser automatically changes the url to the https version)
This is serving the website, but this way of serving the website is not reliable in production. So, lets go on.
Load the shape data
If the shape data tables are not yet populated in your copy of the Seshat core database and you have access to source data, populate one or more of them with the instructions here.
Testing Gunicorn’s ability to serve our Project
Gunicorn is usually installed as a Python package within the virtual environment, and its executable is available in the bin directory. The last thing you need to do before leaving your virtual environment is test Gunicorn to make sure that it can serve the Django application. You can do this by entering the project directory and using gunicorn to load the project’s WSGI module:
cd ~/seshatprojecthome
Note
You might need to do (sudo ufw allow 8000) to open the 8000 port, if you have not taken care of the firewalls (security groups) properly.
gunicorn --bind 0.0.0.0:8000 seshat.wsgi
You can go back and test the app again in your browser. Is it working? So far, so good.
We are now finished configuring our Django application. We can back out of our virtual environment by typing:
deactivate
We have tested that Gunicorn can interact with our Django application, but we should now implement a more robust way of starting and stopping the application server. To accomplish this, we’ll make systemd service and socket files.
Start by creating and opening a systemd socket file for Gunicorn with sudo privileges:
sudo vim /etc/systemd/system/gunicorn.socket
Inside the gunicorn.socket file, write this:
[Unit]
Description=gunicorn socket

[Socket]
ListenStream=/run/gunicorn.sock

[Install]
WantedBy=sockets.target
Next, create and open a systemd service file for Gunicorn with sudo privileges in your text editor. The service filename should match the socket filename with the exception of the extension:
sudo vim /etc/systemd/system/gunicorn.service
Inside the gunicorn.service file, write this:
[Unit]
Description=gunicorn daemon
Requires=gunicorn.socket
After=network.target

[Service]
User=ubuntu
Group=www-data
WorkingDirectory=/home/ubuntu/seshatprojecthome/seshat
ExecStart=/home/ubuntu/seshatprojecthome/seshatprojectenv/bin/gunicorn \
                --access-logfile - \
                --workers 3 \
                --bind unix:/run/gunicorn.sock \
                seshat.wsgi:application

[Install]
WantedBy=multi-user.target
You can now start and enable the Gunicorn socket. This will create the socket file at /run/gunicorn.sock now and at boot. When a connection is made to that socket, systemd will automatically start the gunicorn.service to handle it:
sudo systemctl start gunicorn.socket
sudo systemctl enable gunicorn.socket
You can confirm that the operation was successful by checking for the status socket file:
sudo systemctl status gunicorn.socket
Next, check for the existence of the gunicorn.sock (do not confuse it with gunicorn.socket) file within the /run directory:
file /run/gunicorn.sock
If there is any problem, check the Gunicorn socket’s logs by typing:
sudo journalctl -u gunicorn.socket
Testing socket activation:
Currently, if you’ve only started the gunicorn.socket unit, the gunicorn.service will not be active yet since the socket has not yet received any connections.
sudo systemctl status gunicorn
To test the socket activation mechanism, you can send a connection to the socket through curl by typing:
curl --unix-socket /run/gunicorn.sock localhost
You should receive the HTML output from your application in the terminal. This indicates that Gunicorn was started and was able to serve your Django application. You can verify that the Gunicorn service is now running by typing:
sudo systemctl status gunicorn
If there are any issues, check them on:
sudo journalctl -u gunicorn
If you make changes to the /etc/systemd/system/gunicorn.service file, you should reload the daemon to reread the service definition and restart the Gunicorn process by typing:
sudo systemctl daemon-reload
sudo systemctl restart gunicorn
Make sure you have no issues before continuing.
—
Configure Nginx to Proxy Pass to Gunicorn
Now that Gunicorn is set up, you need to configure Nginx to pass traffic to the process. Start by creating and opening a new server block in Nginx’s sites-available directory:
sudo vim /etc/nginx/sites-available/seshat
The content of the seshat file should look like this:
server {
    listen 80;
    server_name **xx.xxx.xxx.xx**;

    location = /favicon.ico { access_log off; log_not_found off; }

    location / {
        include proxy_params;
        proxy_pass http://unix:/run/gunicorn.sock;
    }

    location /static/ {
        autoindex on;
        alias **/home/ubuntu/seshatprojecthome/seshat/seshat/staticfiles**/;
    }
}
We are almost done. While here, we change the content of nginx config to make sure that it can access all the files in our project:
sudo vim /etc/nginx/nginx.conf
On the top of the file, the user should be changed from www-data to root:
user root;
Save and close the file when you are finished. Now, you can enable the seshat file and enable the website, by linking it to the sites-enabled directory. The purpose of creating a symbolic link is to enable or activate a specific site configuration. In Nginx, having the configuration file in the `sites-available` directory doesn’t automatically make it active. By creating a symbolic link to the `sites-enabled` directory, we effectively tell Nginx to consider this configuration file when it starts or reloads its configuration:
sudo ln -s /etc/nginx/sites-available/seshat /etc/nginx/sites-enabled
Test your Nginx configuration for syntax errors by typing:
sudo nginx -t
If no errors are reported, go ahead and restart Nginx by typing:
sudo systemctl restart nginx
You should now be able to go to your server’s domain or IP address (without the :8000 or other ports at the end and with http instead of https) to view your fully functioning application.
Setting up a domain and SSL certificate
TODO: add instructions on how to set up a domain and SSL certificate for the server.